Category: Customize

Personalización de objetos

  • Custom colored shirt with wax crayons.

    Custom colored shirt with wax crayons.

    Our baby is growing fast and likes to participate in what we do, so a few weeks ago I thought it was time for our first craft together: A custom colored shirt with her name on it.
    For this work we only need a tee, paper and crayons.

    camiseta m
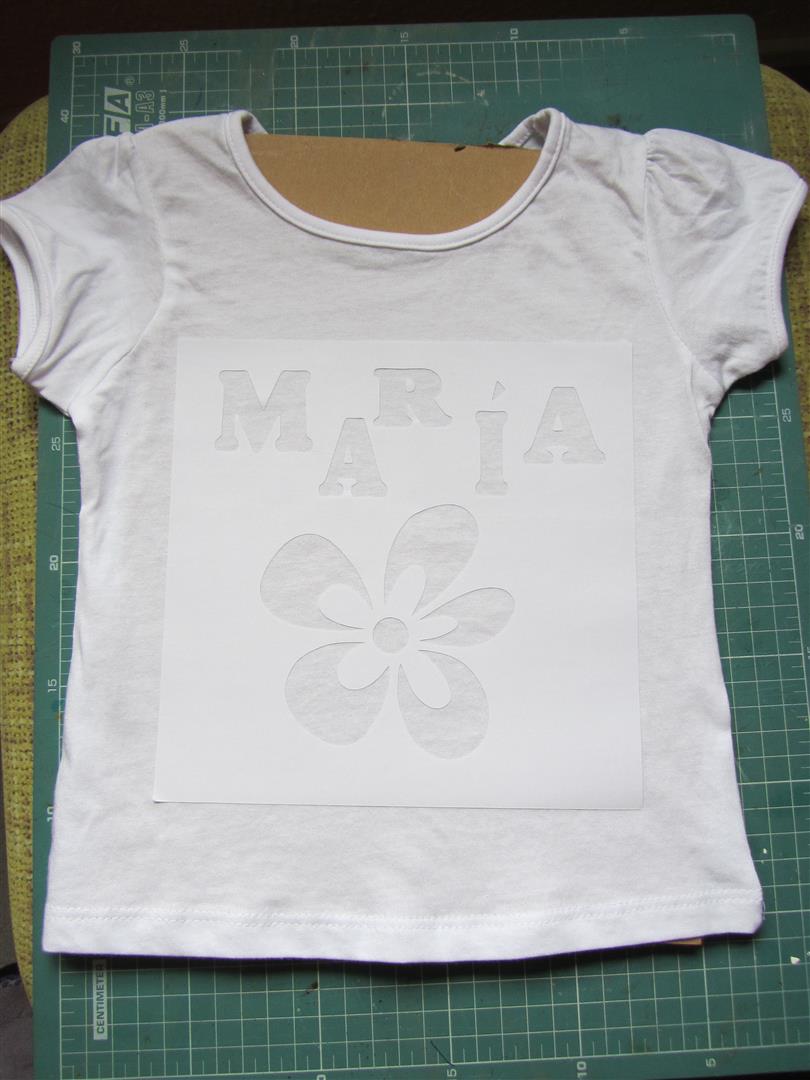
To start we cut the picture we want to do on the shirt on a sheet of paper. In my case I did it on an adhesive paper that can be purchased at any stationery store, and would avoid the bits of wax to sneak on sites we don’t want to color.


    1 (Large)If you use an ordinary paper, put it by carefully on the smooth fabric and see that it will not rise. To do this with children is much more practical, as I say, to stick the paper to the fabric. (the glue is not very strong, so it can then be removed without problems). And between the front and back of the shirt put a cardboard or several papers to absorb the excess of wax and protect the back of stain.

    2 (Large)

    With a pencil sharpener, we make powder with the waxes we want to use. I made a pile for each color, but I knew that María was going to mix them, and effectively his “decision” was to use all the colors at once.

    4 (Large)

    6 (Large)

    5 (Large)

    9 (Large)
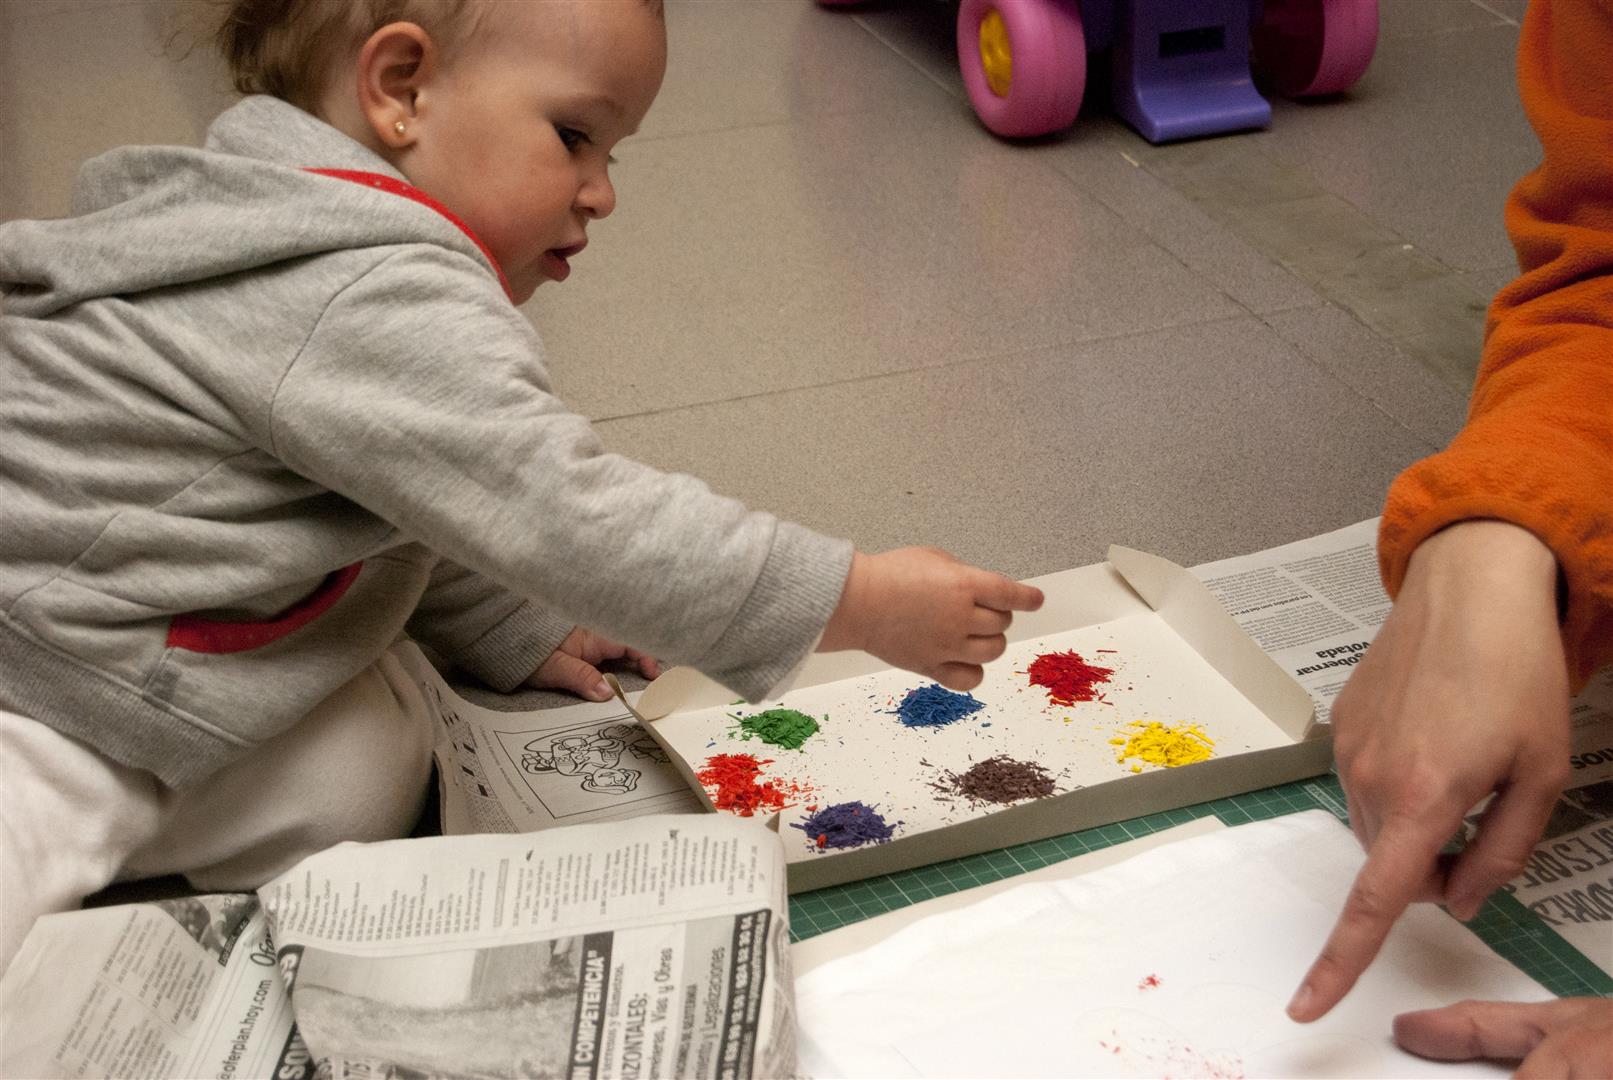
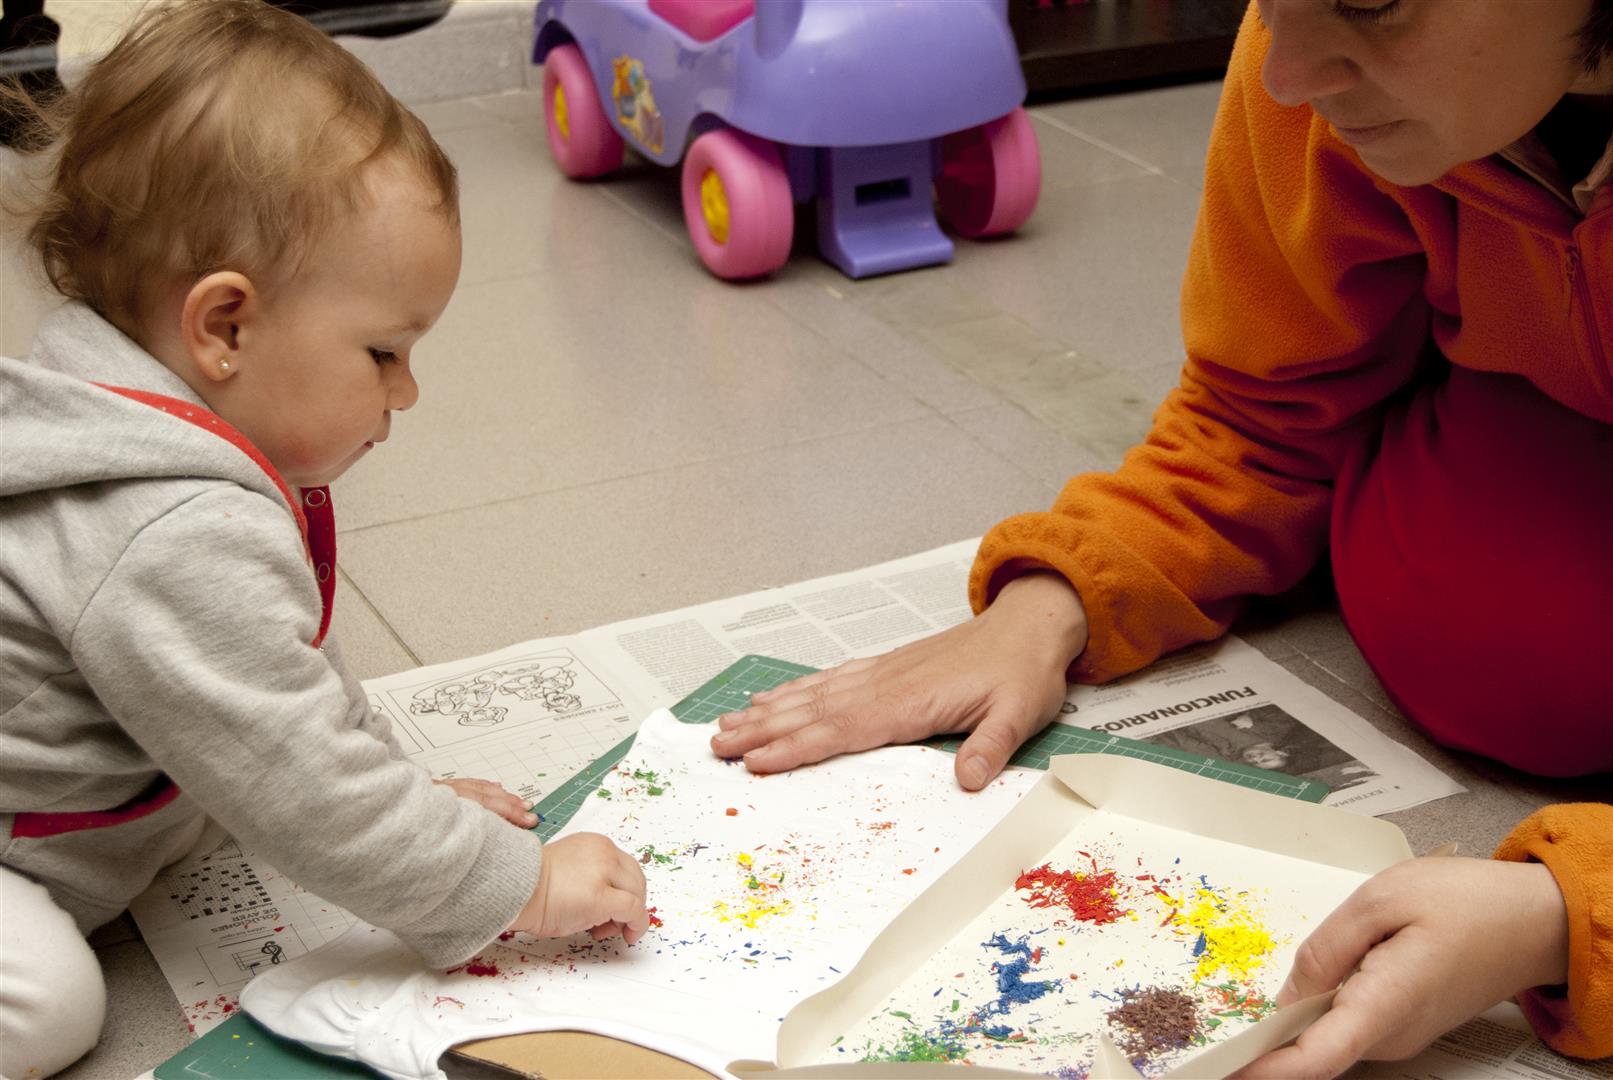
Split the chips on paper with the design that we like and at the end, carefully helping with a brush, withdraw all the bits that have been left out of the work area. (If there is anyone out then we will have unwanted spots).

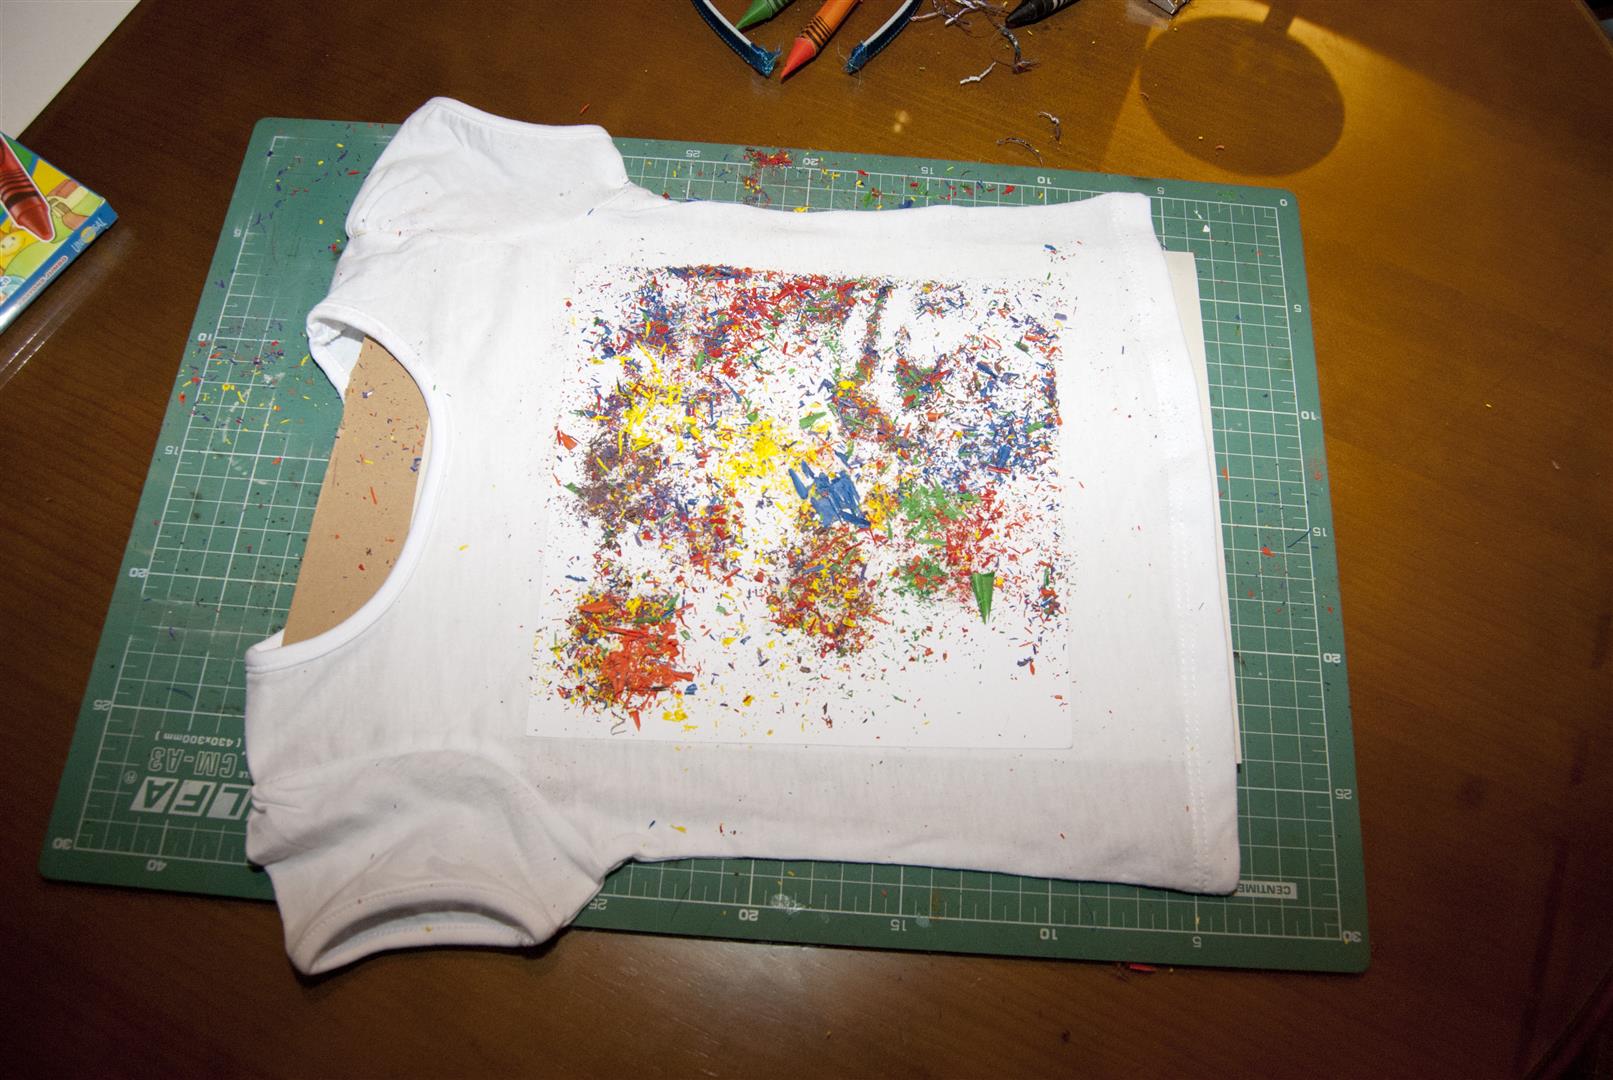
    We place a sheet of paper on the drawing being careful not to move the wax (in this case did not matter much because the colors were mixed, but if the design has a definite pattern will be damaged by moving chips with paper above).

    91 (Large)
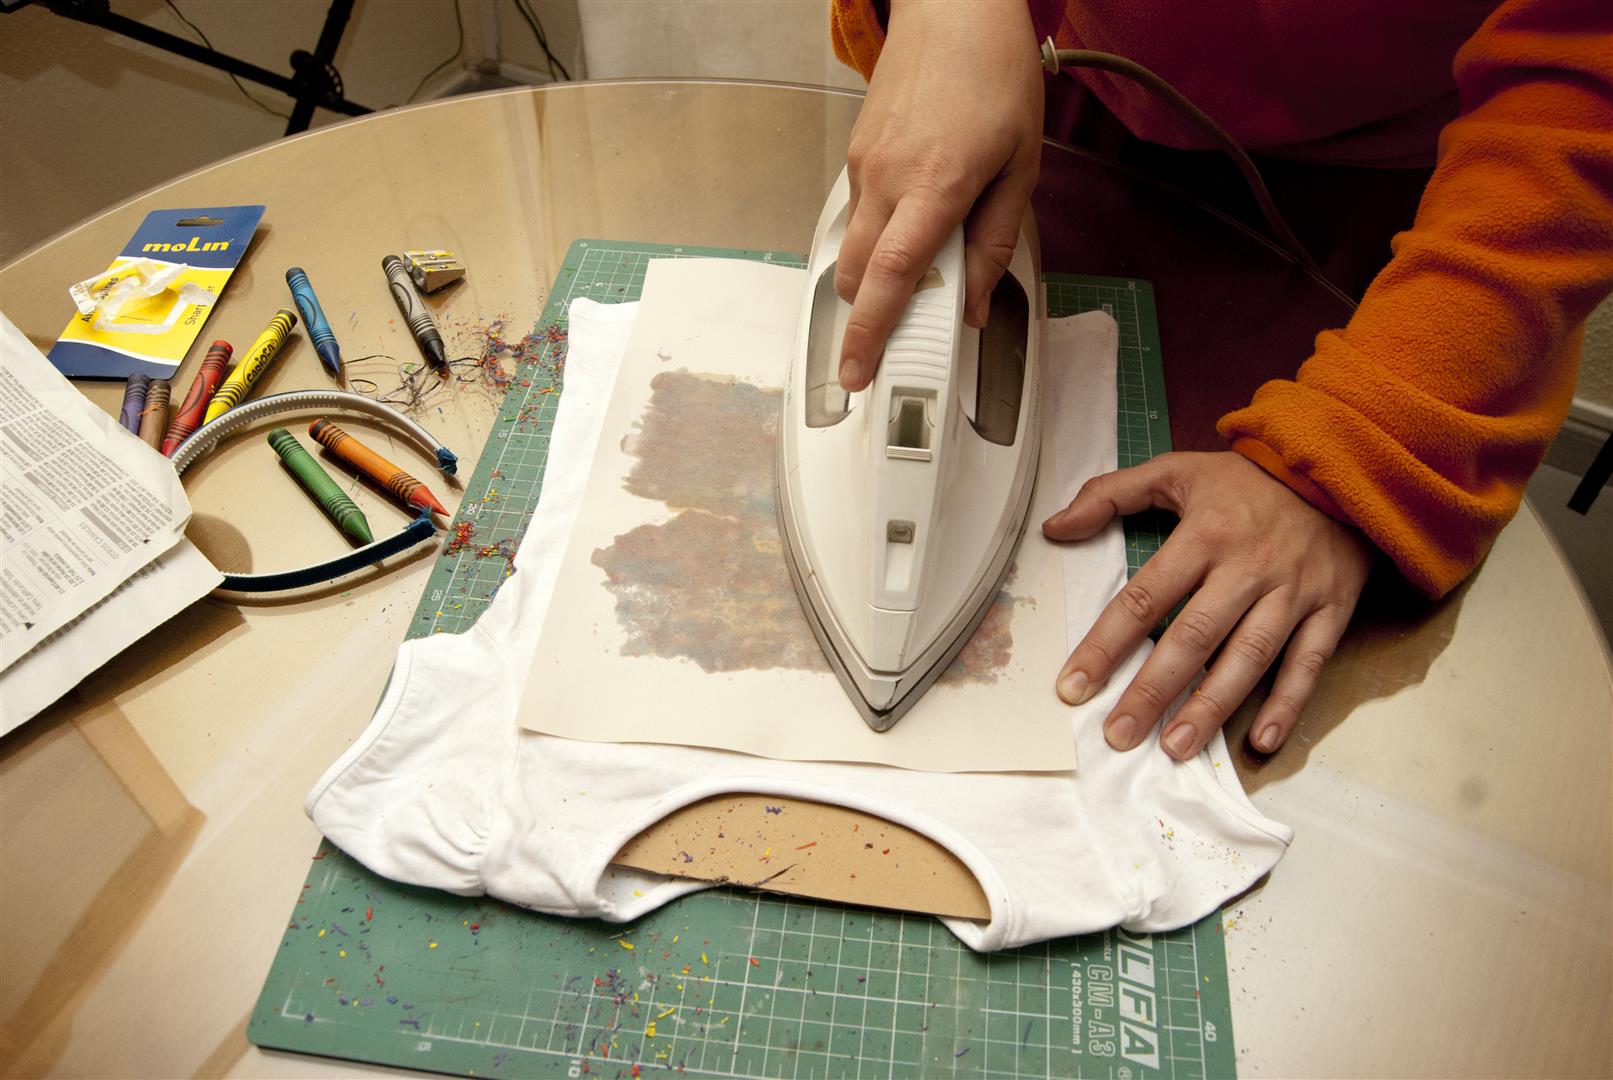
We turn on the iron to medium heat and without steam. This way will take a little longer to melt the wax, but if you set it too hard or ironed too long, too fat spread the wax around the edges of the drawing leaving it poorly defined.

    92 (Large)

    When we see how the iron melt waxes and paper absorbs excess, it is very easy to see when to stop.

    Just after the upper board paper is removed and left to cool.

    We can now remove the paper template and presto, we have a new shirt.

    93 (Large)

    94 (Large)

    96 (Large)

    You can of course do the drawing without template, it’s all about skill. And it can also be fun that older children draw a picture with soft wax on the fabric and then secure them with the iron. I have not tried, because Maria is very tiny, but I think it would be better to use a slightly more rigid (one canvas or something) so it does not deform while painting fabric, and then sew it on a t-shirt ..

    These shirts can be washed in the washing machine quietly, although it should be done with the garment inside out and in cold water.

  • Custom railway stock cars.

    Custom railway stock cars.

    Today I will talk about our time like model makers, but this time in the second stage, the railway modellers in Trenes y Maquetas SL (TREYMA). Between model and model, when there was not a large workload, we searched a way to solve the problems we have had in the last model made or how to optimize the way we do it.

    Nasa STS
    Nasa STS

    The acquisition of new machines also made ​​us having to become familiar with them and learn their operation to extract all the performance possible. Well, if we add some extra time, problem solving and the new machine, the result is the customization of wagons, locomotives, etc..

    One day, we were commissioned to make a model that, although it was not large in size, it  required many repetitions and it had stickers that needed to be cut. Hence we decided to buy a vinyl cutter.

    The plotter we bought was Secabo C30 III, which had a laser positioning system, which allows you, once printed whatever you want to cut in the printer, place it for cutting in the plotter, something more than useful when printing and cut decals.

    Star Wars
    Star Wars

    One problem that most bothered me about the theme of the decals was the decals with white background, which were somewhat thicker than the clear ones, and once placed they let see white edges. Also if they were placed somewhere with a dark background it showed a dark shadow. Well, the solution to this problem was to cut the shape of the decal in a vinyl mask, paint the background in white and place there a transparent decal, the result was more than acceptable, it was almost perfect.

    As well as model shop, TREYMA was model train store, and we had H0 scale  wagons with which we could test new techniques for painting and labeling of future models.

    Thor
    Thor

    During the post have you seen pictures of some of our customizations. Clicking here you have more photos.

  • Transfer image to canvas

    Transfer image to canvas

    Let’s go today with a new technique. Those of you become accustomed to serach  this kind of stuff online aybe you have already seen, it seems to have become populae lately, so I will not be the first nor the last to explain how, but here I tell you our experience .

    In this case we will transfer a photo to a canvas. Some might say that why, if it’s easier (and let’s be honest, is better) send it to any photo shop (almost all of them do it), but it’s about exploring the possibilities. Now is canvas, but it could have been any material. Wood for example I have in mind the picture of leap of faith (for fans of Indiana Jones), but it could be anything. And playing with texture and brushstrokes can give different effects. This, as I say, has been a first contact.

    Let’s start with the materials:

    – Brush, or whatever we want to use to spread the gel.

    – Gel Medium. It’s an acrylic substance whose function is to enhance the technical capacity of acrylic paints, but in this case it  “catchs the toner image” to be attached to the stand you choose. It can be purchased at craft stores or fine arts. They are different types, matt, gloss, etc, in my case the one I found was sold specifically for image transfer.

    -The  photo you want, laser printed but inverted (now you will see why). And on paper as thin as possible.

    – Water.

    – Varnish.

    – Patience.

    Impregnate the image with gel. In my case I gave three passes on the recommendation of the instructions, (I fear that what they want with those instructions is to use more than the necessary amount) waiting for it to dry between each one.

    At this point we must keep in mind that the last of the brush will be felt on the bottom so unless you want that effect, you have to be careful not to give wildly past.

    In this case gave the strokes horizontally. Care must be taken to cover with a generous layer the complete surface, since at points where is not any gel, we’ll lose that piece of the final image. We can also play with this, as with the order of the strokes when we want to get different results.


    As soon as we finish the last coat and before it dries (it dries very quickly, at least the one I have). We place the image face down on the cnvas, hence the need to print in mirror, since the final reproduction will be reversed.

    We extend the paper so that there are no wrinkles or bubbles. You see that there have been some bubbles?we have to remove it by hand or helping us with a sponge or cloth. If not, in that area we’ll miss the photo.

    Although it’s dry in a couple hours, I noticed that the longer you let it dry was better, so if there’s no rush it’s better to leave even a day.

    This is where patience involved. The way to remove the paper on which we print is moistening and rubbing it with your fingers until it disappears, hence I specified that the paper should be as thin as possible, although laser prints are often made as minimum of 80gr paper and in much of the copy shops (if you have no home laser printer) they use 100gr paper.

    I think you could easily make it  printing on transparency, since the image will remain in the medium and the acetate will peel off, but I can’t assure you, because I have not tried.

    At this point I have to point out how cute this girl was dressed as a bride …


    When the paper is wet it’s hard to know if everything is peeled, so despite you  having been a long time scratching, once dried we can find a “veil” of paper still attached.

    It’s a matter of keep rubbing and wetting, it ends up taking off, but be careful not to take the falso the gel with the image. You can see in the left and right margins of the picture some imperfections because it raised  the photo and center of the dress is a part that has not sticked well.

    Of course, I could have repeated the work to do a perfect job and it will seem that the first time everything is wonderful, but no, this post is to show you the first test with this material, with its successes and failures.


    Of course, when something goes wrong, try to take advantage, so to make it appear that stuck defects were purposely sanded other areas of the image.

    The idea was to leave blank margins, but there were remnants of paper and had been a little dirty, so I decided to give it a bit of paint. (Though not think it was a big hit).

    To protect the table we apply a satin varnish, matt or gloss, as we want, and this is the result:

    I encourage you to do the test, in the material you can think of. It can be done, such as a collage, by hand, (without resorting to Photoshop), and if you have kids, they will surely entertain some fun scratching the paper until they see the photo appear as a sticker … but bigger.